Whether you manage a large or small business, your business needs leads… and quality leads at that.
In this post I will show you how you can get leads for business, leads for contractors, leads for real estate agents … or leads for whatever your business is. I am certain that you will be able to get leads online for your business using this technique.
This method is not as popular as it COULD be and, in fact, many former users were so turned off of this app when it was first introduced that now you can get leads … and, for less than you might think!
And, in case you are wondering, yes, this IS a very legal and “white hat” process, so don’t be too quick to simply leave without first hearing me out completely!
So, let’s get started…
If you do not already have a Facebook fan page created for your business then for your next step you will need to set one up.
Choose the type of page that best describes your business, click on that icon and follow the prompts. Video below offers very helpful instructions.
Should you already own a Facebook fan page, you may want to jump to the following instructions while those who need to know, can learn…
How to Create a Facebook Fan Page
Facebook’s recommended image sizes for your fan page are clearly stated here: https://www.facebook.com/help/125379114252045 as being best at 851px x 315px and less than 100KB in overall file size (for quicker loading) for your cover image, and 170px x 170px for your profile image.
Be sure to complete your entire business fan page, especially the “About” tab, as this will give your visitors a lot more information on ways to contact you.
Cover images could be obtained either by hiring someone on, let’s say, Fiverr.com … or … you could use a free platform like Canva.com where all you need to do is sign up and be able to create all sorts of images for free.
How to Use Canva for Beginners
Never, never, never Google search and use any images that you find. You need to use images that are royalty free so you won’t find yourself served with an expensive lawsuit for copyright infringement.
Be sure that ALL of the necessary fields in your Facebook fan page have been completed before you attempt the next step.
Once you have finished the next step, you will find that you are no longer able to edit your fan page from within Facebook.
Getting Leads for Your Business
Facebook’s Business Manager is meant to be a simple method offered for users to manage multiple fan pages with advertising accounts, and this tutorial is being offered only as an option that is available to use IF you so wish.
WARNING: Once you add your fan page to Business Manager it becomes the only administrator of that page and no one else can claim it for any other use.
Those with admin access to a Facebook page will still have access to it from Facebook, though they will no longer be able to edit the fan page from within Facebook itself.
Editing access will need to be assigned from within your Business Manager.
This information is meant to be as transparent and helpful as possible by offering you these warnings up front.
However, if you ever decide that you want to remove a Facebook fan page from Business Manager it is easily done from within your Business Manager account.
And, this would easily restore the fan page admin’s rights to edit the page from within Facebook, once again.
Managing Your Facebook Fan Page once Added to Business Manager
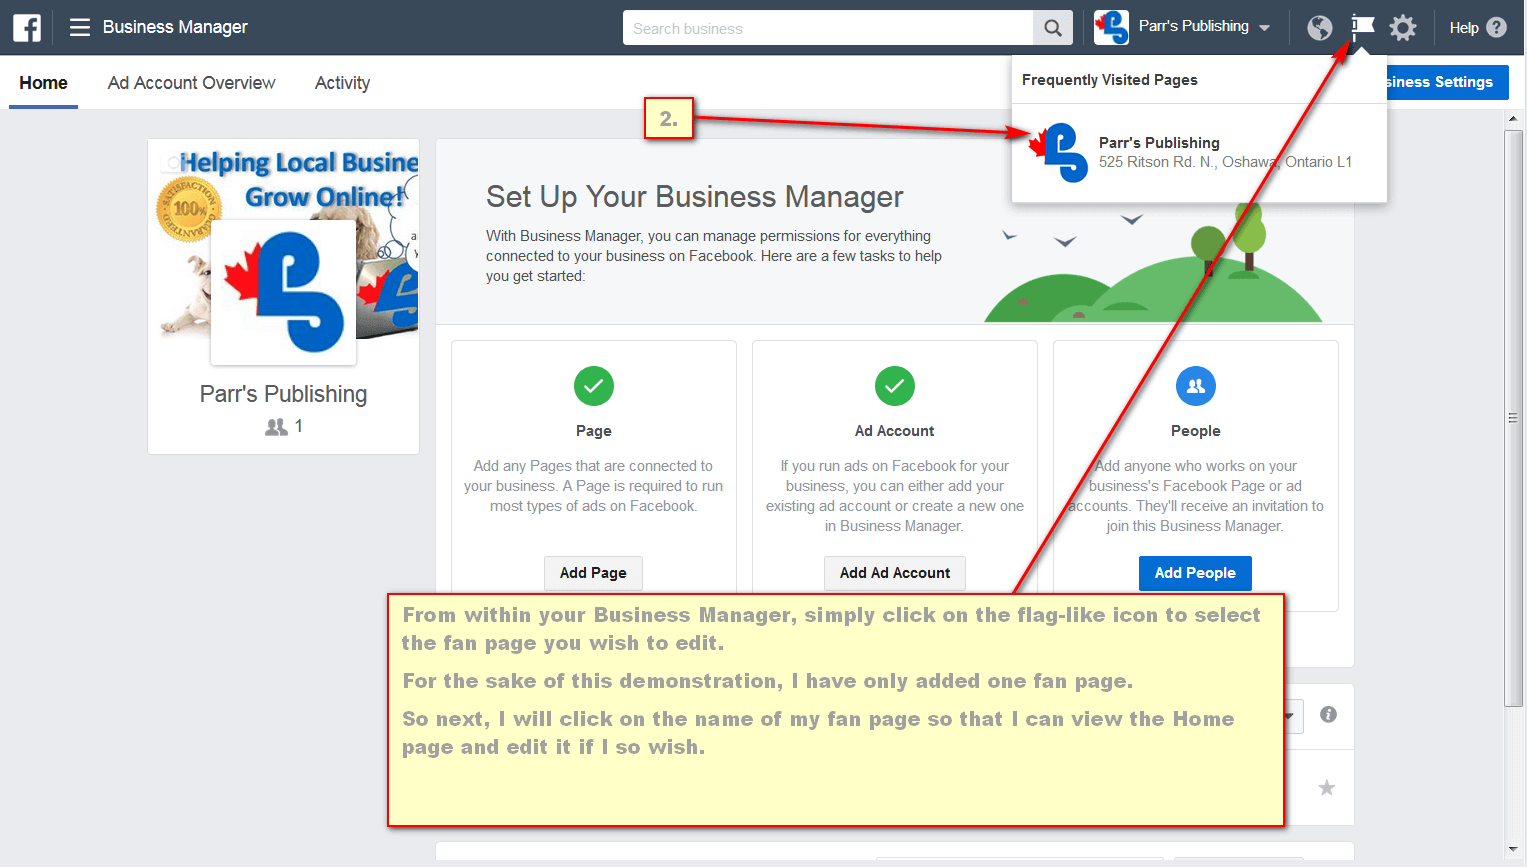
As the image above clearly instructs you, “from within your Business Manager, simply click on the flag-like icon to select the fan page you wish to edit.”
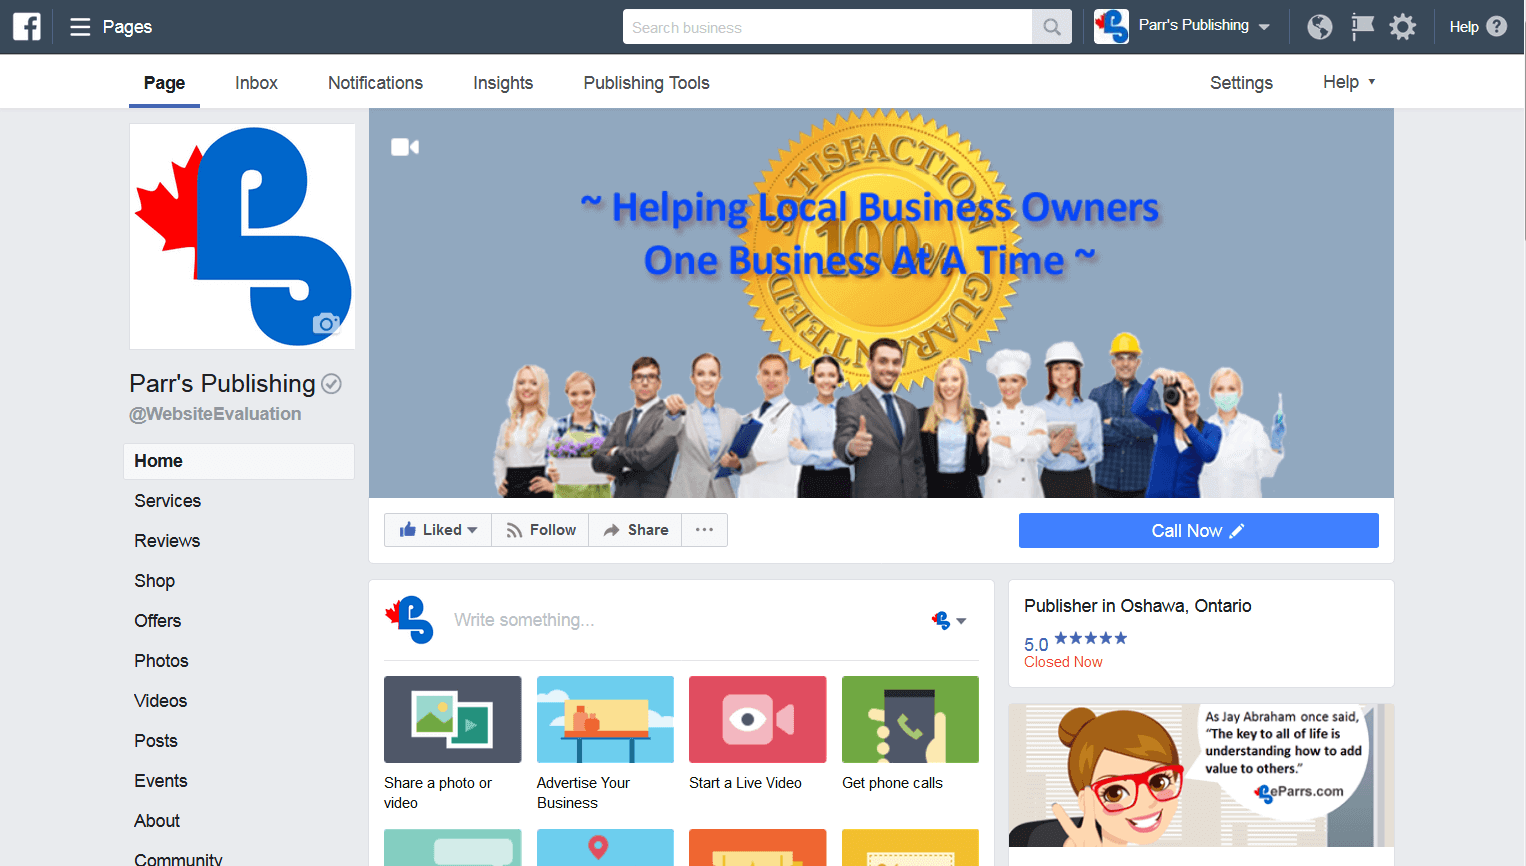
Once I did this, you can now see by the following screen print that my Facebook fan page is now in edit mode from inside my Business Manager account.
Setup Facebook Business Manager
Understand going forward: Business Manager is NOT Facebook … though it is owned and serviced by Facebook. It is an entirely separate platform or stand alone application, and in years past has been known to cause functions from within Facebook to fail causing errors to be seen.
Since those early days, Facebook has setup support and groups which were created to help marketers with any issues they may find, going forward.
Some users have complained that Facebook Business Manager keeps fixing the errors and improving this tool, yet still new bugs seem to emerge nearly every day.
Though it is advisable for you to use an already established Facebook account, you could setup a brand new account using your business name.
I mention this here only because I have been informed that an established account would offer you less chance of having Facebook flag something or thinking something is suspicious then if you were to simply open up a brand new Facebook account.
For the purpose of this writing, I am addressing sole proprietors and small business owners who are; looking to advertise in multiple countries, are owners of a blog that needs to reach a custom audience, are owners of an eCommerce business, or those of you who work with/for other businesses (Business to Business).
Larger businesses would need different instructions for Business Manager then are offered here.
Business Manager Overview
Setup Facebook Messenger in Business Manager
NOTE: Please be aware that Facebook Business Manager has gone through some minor changes (in the options they offer) since the above video was recorded … as I am sure you will notice when following along with any of the videos included here. Though, the information here is still ALL very relevant.
Create an Ad Account in Business Manager
NOTE: You have a choice for payment method, either credit card of PayPal. You will also see an option for “Facebook Ad Coupon” and this is where you would add a code given to you by Facebook where you might be saved some money.
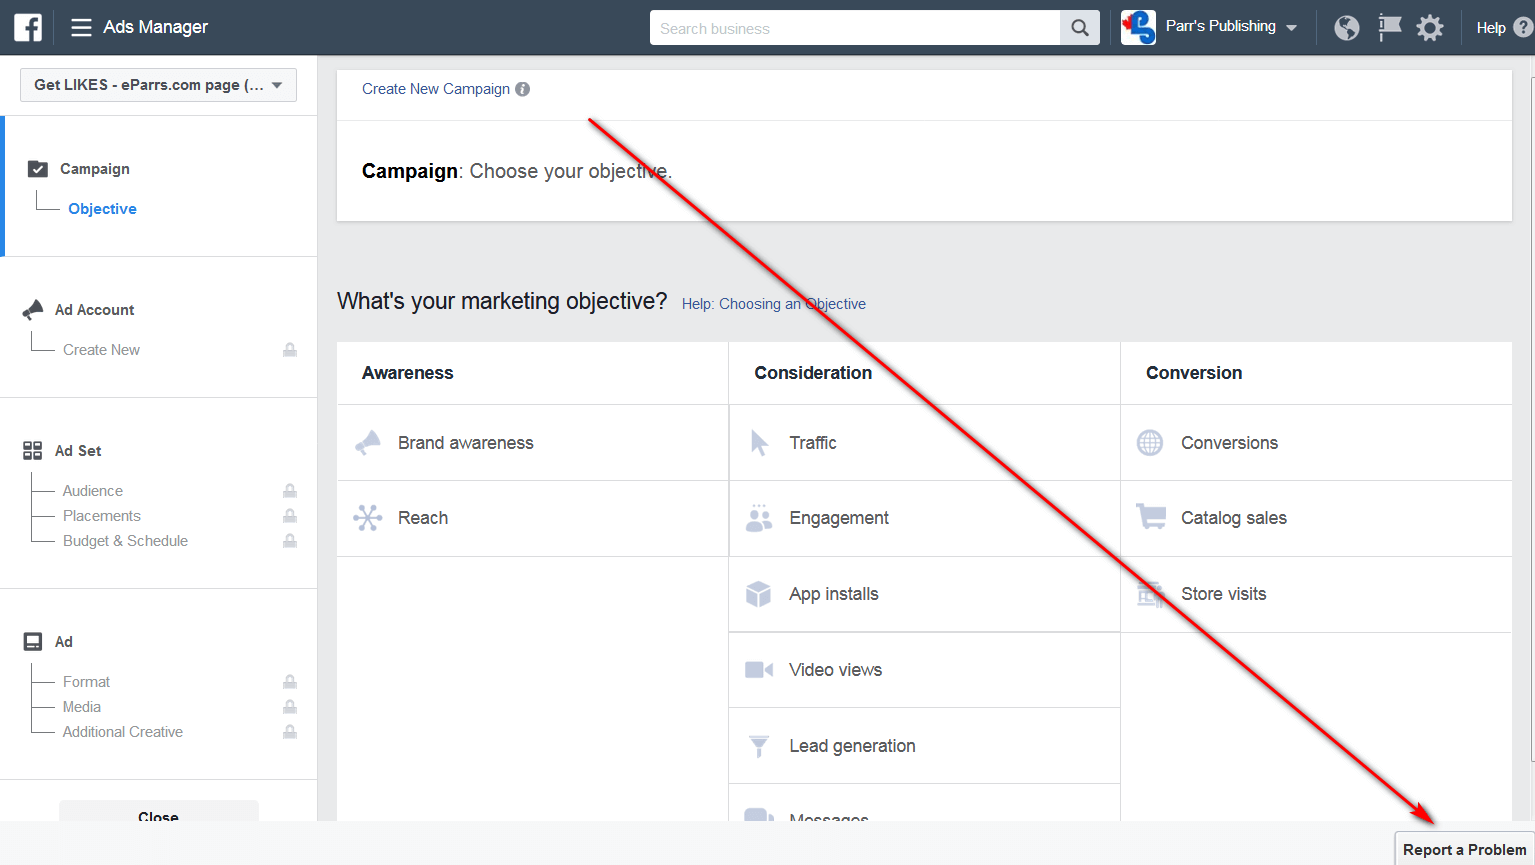
WARNING: Make sure you select the correct Currency as you cannot change it later. However, you may get help fixing this if you DO forget to change your perferred currency, by clicking the “Report a Problem” … see screen print below.
Next, if you want to create offers from your fan page, you are going to want an autoresponder setup. So, now you need an autoresponder so that you will be able to collect your own list of email addresses.
In order to connect your chosen autoresponder, FIRST you need to go to your Business Manager and select Business Settings.
Once there, go to the left-hand sidebar and select “Ad Accounts”, then from near the top right of your browser window, you should see a button named “Add New Ad Accounts”, once you have clicked on it, select “Add An Ad Account” from the dropdown box.
Once the new popup window appears, you can give your Ad Account ID a name. If you want to change the name later on you can easily click on the pencil icon of your newly created Ad Account, and change the name.
You will need to have already selected and setup your “Payment Method”.
Now that you have your new Ad Account… from the list of links below your title:
- ) click on “View Ad Account in Ads Manager”,
- ) from there, look toward the top right of your monitor for a green button labeled “Create Ad” and click on it, which will take you to another window.
- ) From the center of this next window, under the column titled “Consideration”, (you might need to scroll down) select “Lead Generation”,
- ) then scroll down and you will see an option to checkmark “Create Split Test” to use your ad campaign if you wish to test for creative, placement, audience and delivery optimization (as of 31 December 2017 this was a new feature). For the purposes of this demonstration, I did NOT select to “Create a Split Test”.
- ) and then click on the “Continue” button.
NOTE: You do have the option to change the “Campaign Name” if you so wish. For my own campaign, I did not change the title from Lead Generation.
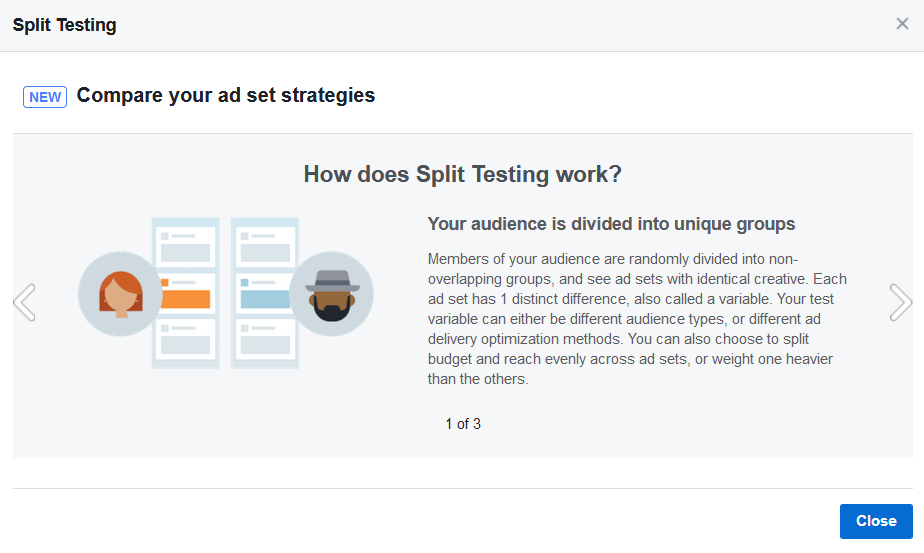
The following 3 screen prints below, explain Split Testing
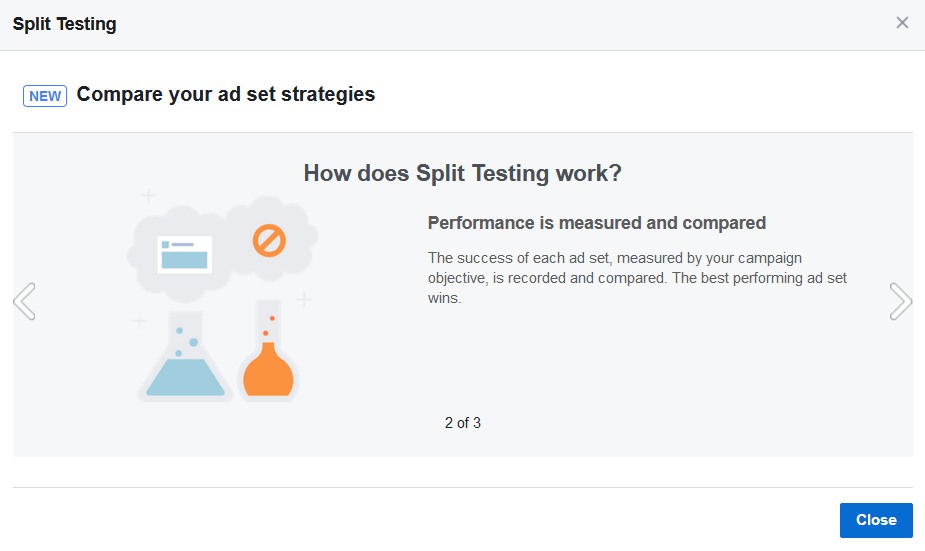
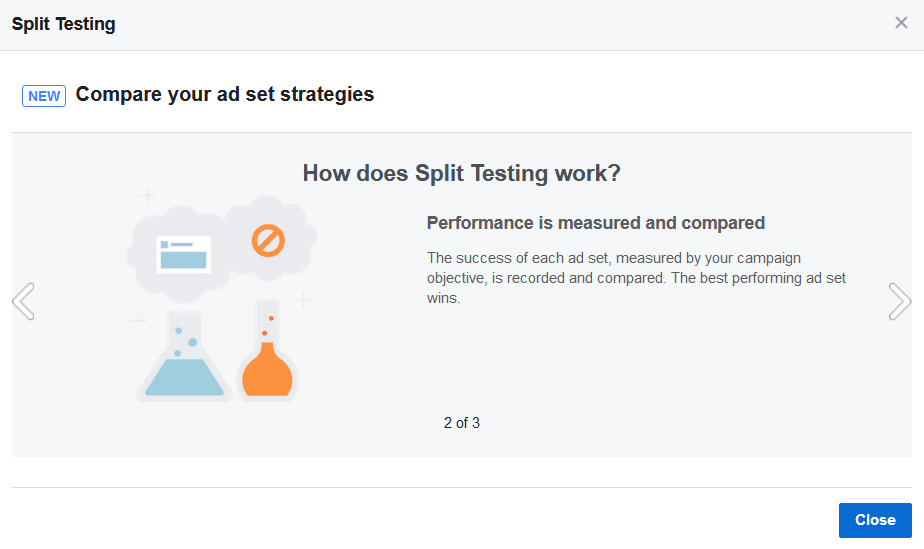
Now, it’s time to accept Facebooks Terms and Conditions so that you can connect your Facebook fan page with your chosen autoresponder.
Please view the following screen prints for the steps you need to take.
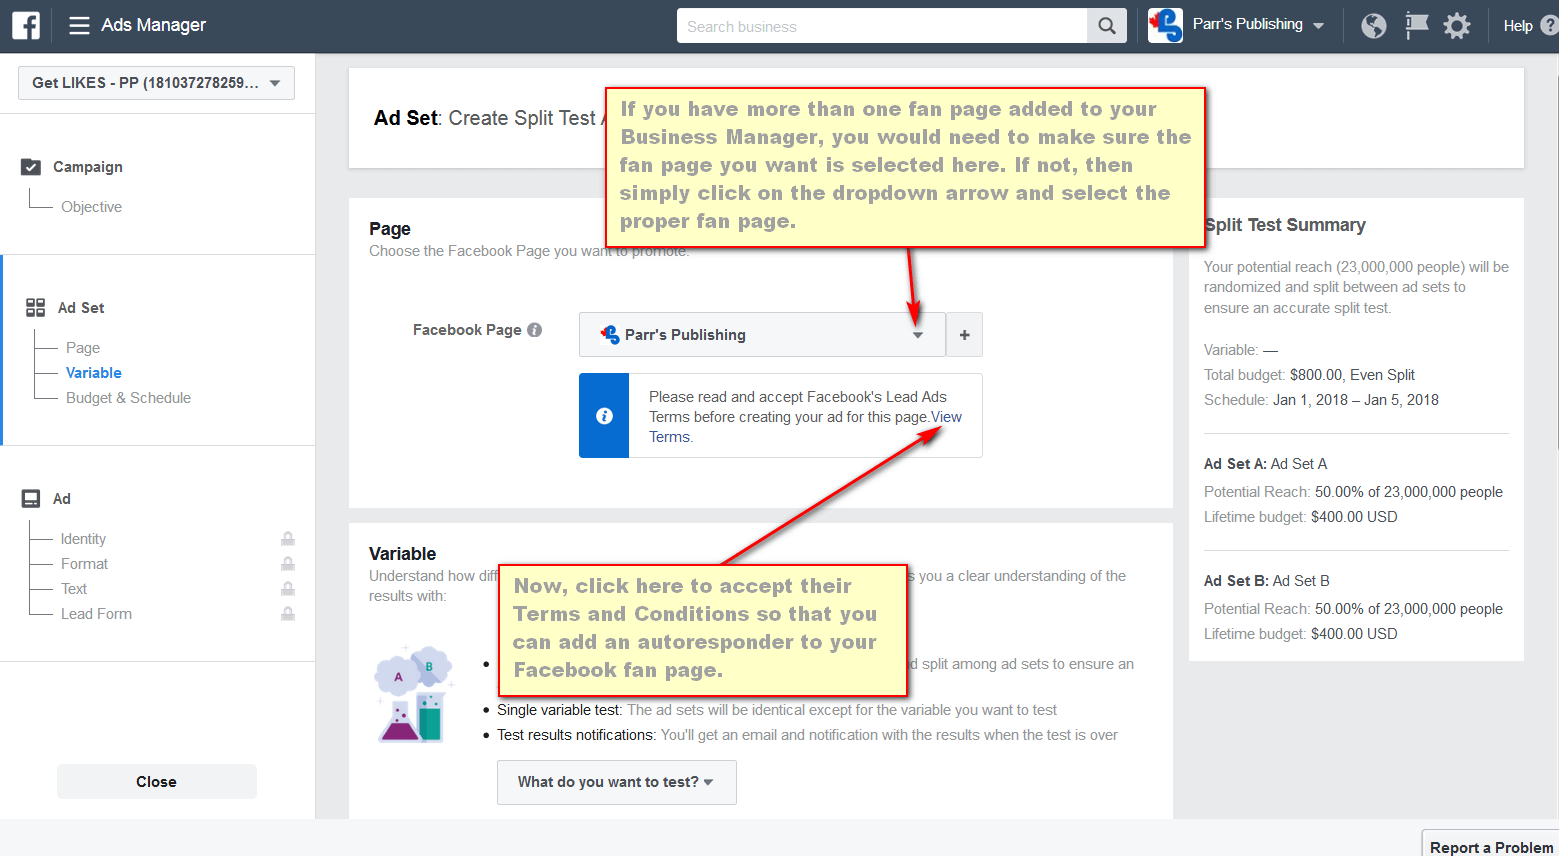
Then… you need to READ and understand Facebook’s Terms and Conditions before proceeding.
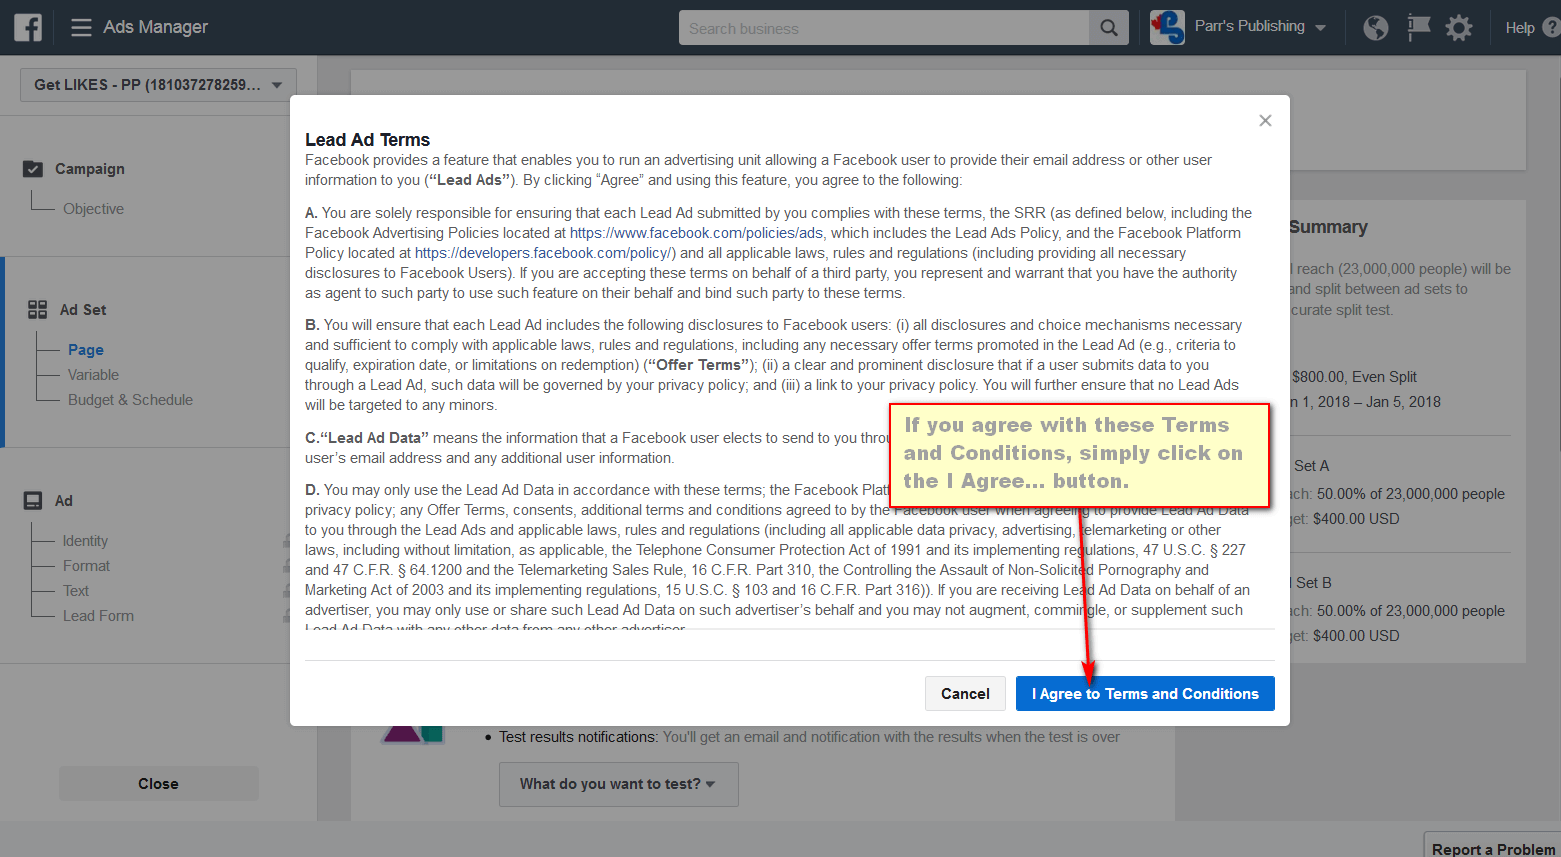
If you agree, then you will see information that “You’ve accepted Facebook’s Lead Ads Terms for this page”… and, you can View Terms again (though, you will need to be logged into Facebook) anytime you want.
Now you can move on to connecting your fan page to your choice of autoresponder.
Add an Autoresponder to Your Facebook Fan Page
Click on the flag-like icon (top right navagation bar), select the fan page you want to use, right mouse-click on the name and select to open your fan page in another tab.
This is to avoid having to complete the Ad form first… in order to connect your fan page with your autoresponder.
Once you have arrived at your Facebook fan page, go to the top navigation bar and click on “Publishing Tools”.
Now you will notice that you have a NEW option under “Lead Ads Forms” (from the left-hand sidebar) where you can now connect your Customer Relationship Management (CRM) or what we like to call, an autoresponder.
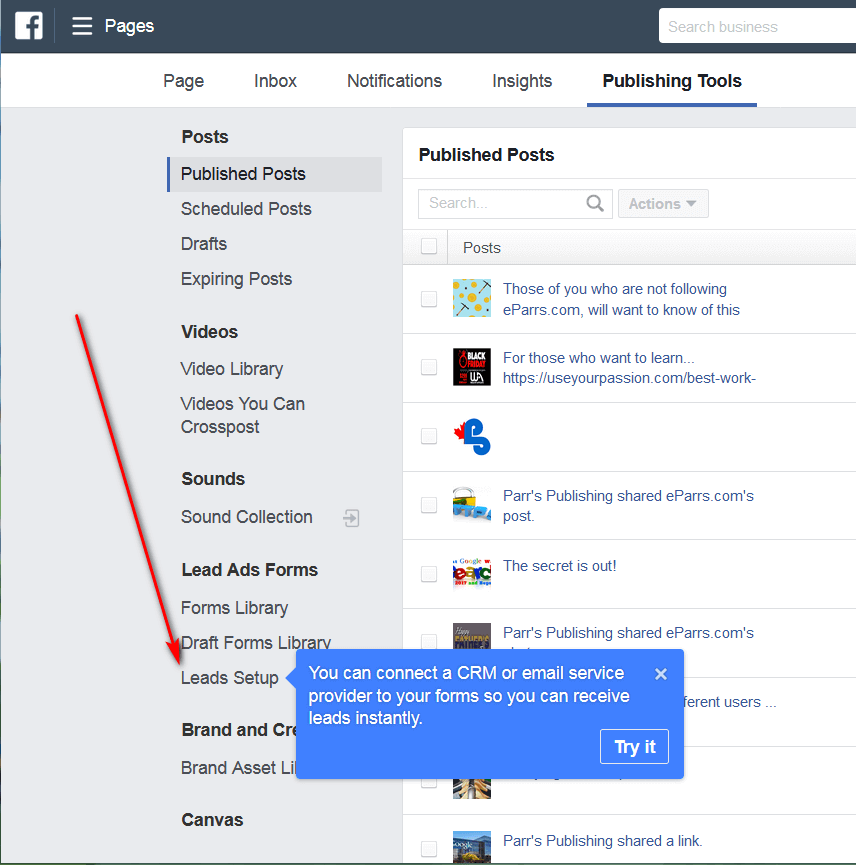
Click the x in the “Try it” popup box, and then click on the “Leads Setup” option. This is where you can connect to a CRM.
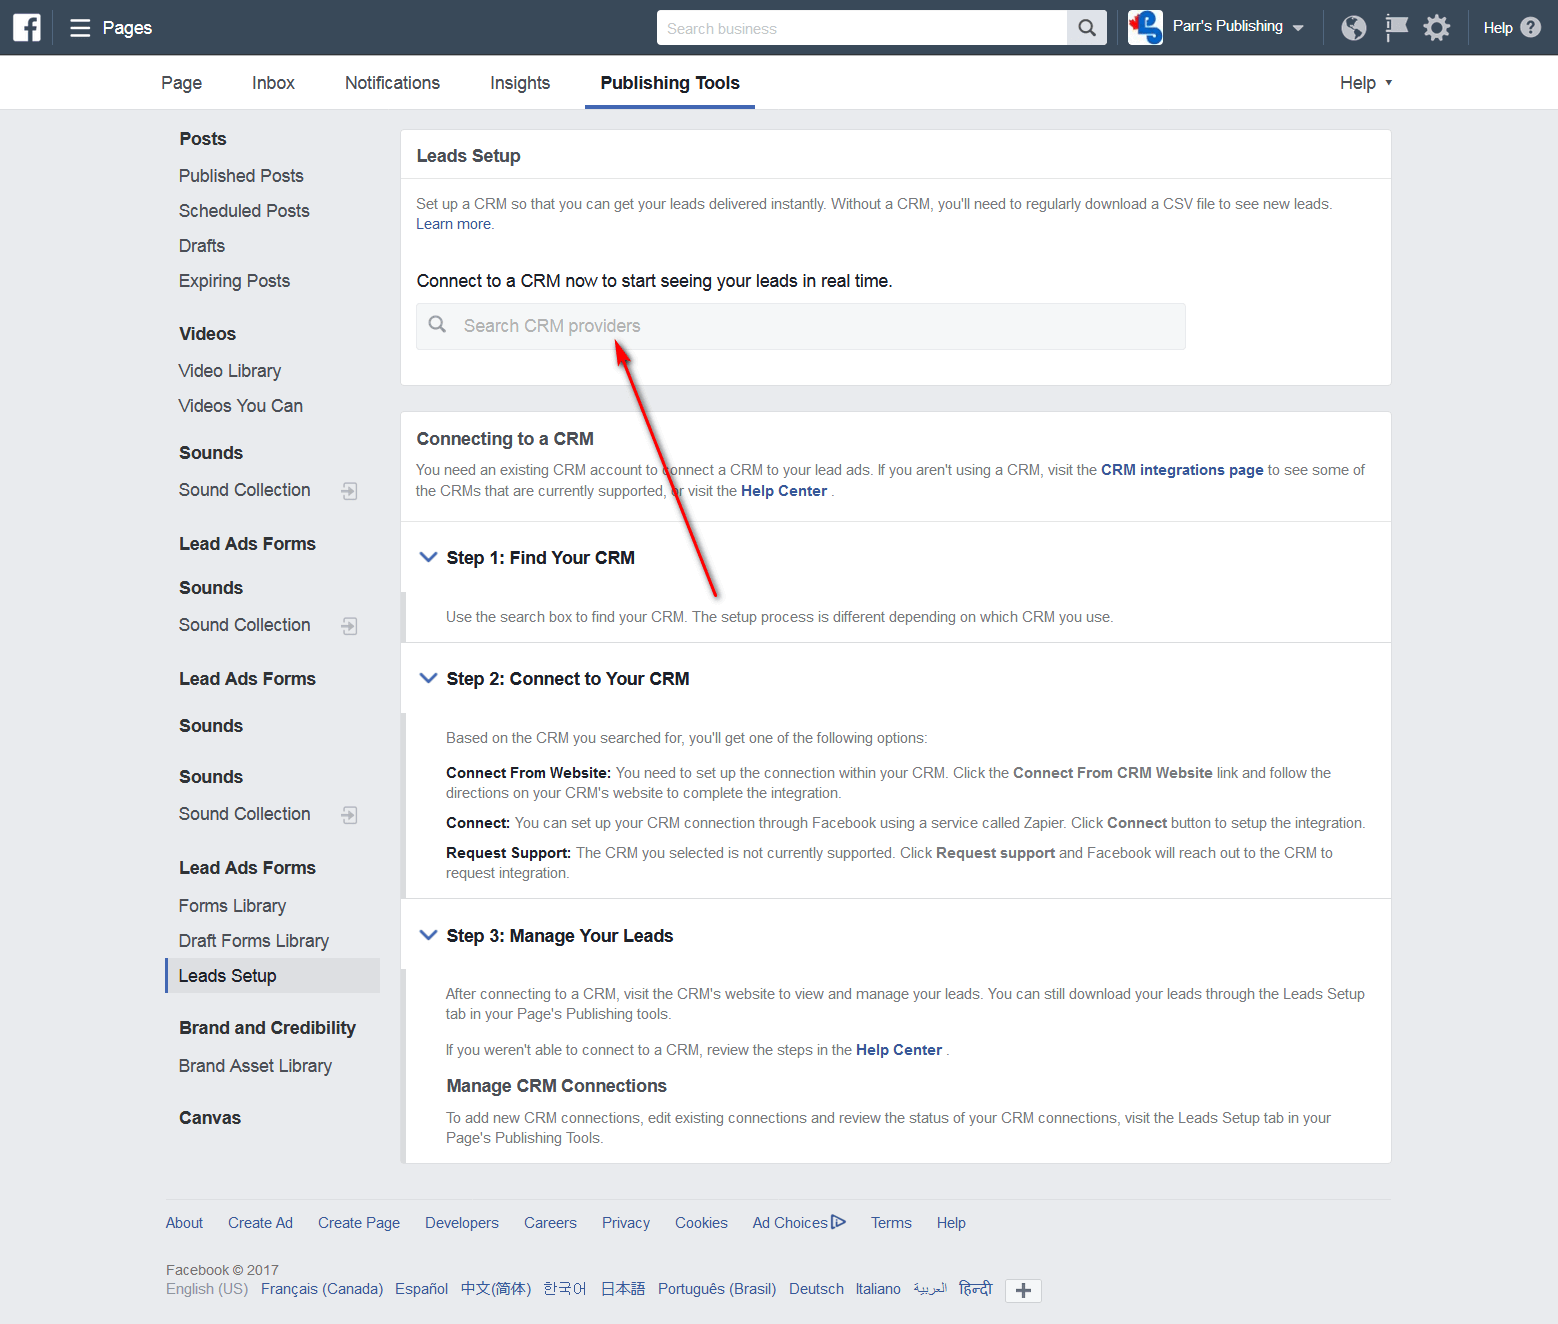
Once you find your preferred CRM, a “Connect” button will appear on the right of your “Connect to a CRM now to start seeing your leads in real time” search bar… simply click on the button to connect then you may have to scroll down, read the instructions your choice of CRM offers you… and be sure to follow the instructions offered there.
There are so very many CRMs to choose from it would be impossible for me to include instructions for EACH one here.
You may need to contact your chosen CRM for their detailed instructions on taking this step if you feel uncertain, as this step can be taxing (depending on the CRM you chose) to say the least.
Should you not find your preferred CRM, you can simply go to the CRM integrations page to connect with your chosen CRM.
NOTE: You will want to integrate with a CRM that have their website protected by a security certificate. If not, then your potential customer’s (and maybe even your Facebook account) information could become compromised.
Understanding Audience Insights in Order to do Target Marketing
Facebook Ads for Lead Generation in Less than 10 Minutes
Now for some great ideas that I have discovered that you can use to help your fan page go viral of Facebook!
Now, another great idea to help your fan page go viral on Facebook is to create a related quiz, one that gets shared by your followers and their friends.
BONUS idea: You might even give serious consideration in creating a new and separate website for creating Facebook quizzes (be sure to encourage others to use your quizzes on THEIR fan pages) … and simply monetize your new quiz site, being sure to use your own quizzes (of course) on your own fan pages.
Create Quizzes with a WordPress Plugin
You can use the Quiz Cat plugin or you can easily search for other plugins that may be available for free to build your quizzes with!
Both of these suggestions may also help you get more Likes for your fan page!
At any time in the future, you no longer wish to have one or more of your fan pages connected to your Facebook Business Manager, here is how to simply…
Remove Your Facebook Fan Page from Business Manager
Worse comes to worse, and you no longer want your Facebook account attached to their Business Manager, you can easily delete your Business Manager. Just be sure to remove all of your fan pages first.
Do hope you found this post helpful and that you share it with all of your friends.
Whether you have a question regarding this post or something you would like included here, please feel free to leave a comment below.


